As I opened my cluttered kitchen drawer, I couldn’t help but feel a mix of frustration and determination. It was time to tackle the chaos and bring some order to this everyday space. That’s when I discovered a collection of budget-friendly kitchen drawer organizers that could be made easily at home. From repurposed cardboard inserts to customizable wooden dividers, these DIY solutions promised to transform my disarrayed drawer into a neatly organized haven. But that’s not all, there were even more ingenious ideas waiting to be explored. Join me as we uncover these clever solutions that will make your kitchen drawer a joy to navigate.
DIY Utensil Tray Divider
To create a DIY utensil tray divider, I recommend utilizing a pre-existing drawer organizer or measuring the width of your drawer and cutting a piece of sturdy cardboard to fit. This homemade cutlery organizer is a cost-effective solution to keep your kitchen drawer tidy and organized.
If you already have a drawer organizer, you can repurpose it by adjusting the compartments to fit your utensils. Simply remove the existing dividers and rearrange them according to your needs. This way, you can customize the layout to accommodate different sizes and types of utensils.
For those who don’t have a pre-existing drawer organizer, making one from sturdy cardboard is a great alternative. Measure the width of your drawer and cut a piece of cardboard to fit snugly inside. Then, using a ruler and a pencil, mark the areas where you want to create compartments for your utensils. Carefully cut along the marked lines, making sure to create straight and clean cuts.
Once you have your cardboard organizer ready, place it inside your drawer and arrange your utensils in the designated compartments. This DIY drawer organizer will provide a practical and efficient way to store your cutlery, keeping everything neatly separated and easily accessible.
Repurposed Cardboard Drawer Inserts
If you don’t have a pre-existing drawer organizer, repurposing cardboard is a practical solution for creating customized inserts. Upcycled cardboard storage is not only budget-friendly but also eco-friendly, making it a great choice for those seeking sustainable organization options.
To create repurposed cardboard drawer inserts, start by measuring the dimensions of your drawer. Cut the cardboard pieces to fit snugly inside the drawer, creating separate compartments for different items. You can use old cereal boxes, shoe boxes, or any sturdy cardboard you have on hand.
Once you have the cardboard pieces cut, you can further customize them by covering them with decorative paper or fabric. This will not only enhance the appearance of your drawer but also add durability to the inserts.
The repurposed cardboard drawer inserts are versatile and can be used for various purposes. You can create sections for utensils, spices, baking tools, or even office supplies. The customization options are endless, allowing you to create a well-organized drawer tailored to your specific needs.
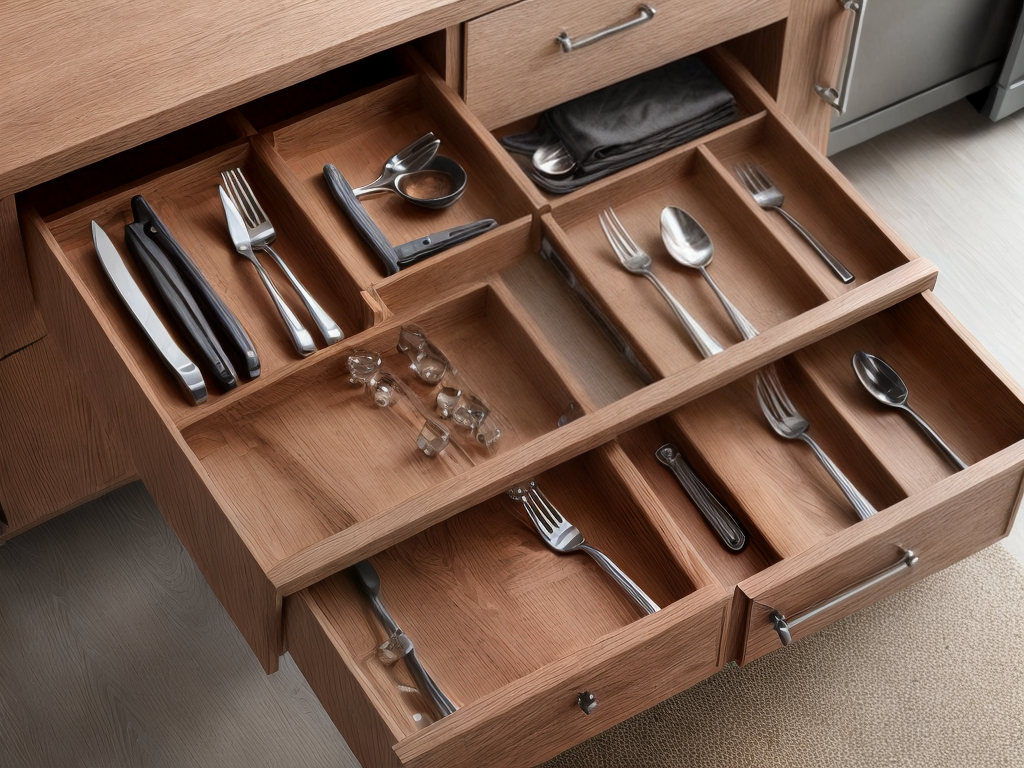
Customizable Wooden Drawer Dividers
I love using customizable wooden dividers in my kitchen drawers because they are an easy and cost-effective way to keep everything organized. With their versatile and adjustable design, I can create compartments that perfectly fit my utensils, tools, and gadgets. These dividers not only keep my drawers neat and tidy but also make it effortless to find what I need while cooking.
Easy DIY Wooden Dividers
For easy and customizable DIY wooden dividers in your kitchen drawer, follow these steps. Wooden dividers are a great alternative to traditional utensil organizers, providing a more natural and rustic look to your kitchen. To make your own wooden dividers, start by measuring the width and depth of your drawer. Cut wooden boards to fit these measurements, ensuring they are tall enough to divide your utensils. Sand the edges of the boards for a smooth finish. Arrange the boards in the drawer, creating compartments for different utensils. Secure the boards in place using wood glue or small nails. Finally, let the dividers dry completely before filling the compartments with your utensils. Enjoy the organized and stylish look of your DIY wooden dividers.
Cost-Effective Organization Solution
To achieve a cost-effective organization solution for your kitchen drawers, consider using customizable wooden dividers. These dividers provide affordable storage solutions and space-saving organization techniques. By using wooden dividers, you can create compartments within your drawers, allowing you to neatly store and separate different items. Not only do these dividers help you maximize the available space, but they also add a touch of elegance to your kitchen decor. Customizable wooden dividers allow you to create compartments of various sizes based on your specific needs. You can easily adjust them to accommodate different utensils, cutlery, or even gadgets. With these dividers, you can keep your kitchen drawers organized and clutter-free, making it easier to find what you need when you need it.
Versatile and Adjustable Design
The customizable wooden drawer dividers offer a versatile and adjustable design for efficient kitchen organization. These adjustable storage solutions are perfect for those who desire mastery over their kitchen space. With these space-saving organizers, you can easily customize the layout of your drawers to fit your specific needs. The dividers can be easily adjusted to accommodate different sizes of utensils, gadgets, and cookware. No more cluttered and messy drawers! Take a look at the table below to see the different ways you can configure the dividers for various kitchen items:
| Configuration | Utensils | Gadgets | Cookware |
|---|---|---|---|
| Option 1 | Vertical | Horizontal | Horizontal |
| Option 2 | Horizontal | Vertical | Vertical |
| Option 3 | Vertical | Vertical | Horizontal |
With these versatile and adjustable wooden dividers, you can create a neat and organized kitchen space that suits your personal preferences and needs.
Mason Jar Storage Solution
I highly recommend utilizing mason jars as a smart storage solution for your kitchen drawers. Not only are they versatile, but they also provide an organized and aesthetically pleasing way to store your kitchen essentials. Here are a few reasons why mason jar storage is a great option:
- Mason jar organization ideas:
- Store dry ingredients: Use mason jars to store dry goods like flour, sugar, and rice. They keep these items fresh and easily accessible.
- Organize utensils: Place your cooking utensils, such as spatulas and whisks, in mason jars to keep them neatly arranged. You can even label each jar for easy identification.
- Store small items: Mason jars are perfect for storing small kitchen gadgets or loose items like rubber bands, paper clips, or spare keys.
Using mason jars as storage containers in your kitchen drawers not only maximizes space but also adds a touch of charm and organization to your culinary space. It’s an alternative storage solution that is both practical and visually appealing. So, get creative and start organizing your kitchen with mason jars today!
Upcycled Egg Carton Organizer
I’ll begin by discussing the points of the upcycled egg carton organizer. Firstly, you’ll need a few materials to get started. Then, I’ll provide step-by-step instructions on how to create this organizer for your kitchen drawers. Lastly, I’ll highlight the benefits of upcycling and how this project can help you declutter and organize your kitchen in an eco-friendly way.
Materials Needed
To create an upcycled egg carton organizer for your kitchen drawer, gather the following materials:
- Empty egg carton
- Scissors
- Craft glue
These materials are all you need to create a budget-friendly storage solution for your kitchen utensils and small items. The DIY drawer organizer made from an upcycled egg carton is not just an eco-friendly option but also a practical way to keep your drawer neat and organized. With a few simple steps, you can transform a discarded egg carton into a functional and stylish organizer. By reusing materials you already have, you can save money while reducing waste. So, let’s gather these materials and get started on creating your very own upcycled egg carton organizer for your kitchen drawer.
Step-By-Step Instructions
Now let’s move on to the step-by-step instructions for creating your upcycled egg carton organizer for your kitchen drawer. To make this budget-friendly organizer, you will need a few materials. Gather an empty egg carton, a pair of scissors, a ruler, a marker, and some glue or tape. Start by cutting off the lid of the egg carton and separating the individual egg cups. Next, measure the dimensions of your kitchen drawer and mark the areas where you want to place the egg cups. Cut the egg cups down to size if needed. Once you have the desired layout, secure the egg cups in place using glue or tape. And that’s it! You’ve created a simple and efficient organizer using materials that would have otherwise been discarded. Upcycling not only helps reduce waste but also allows you to create personalized solutions for your kitchen organization needs.
Benefits of Upcycling
Upcycling the egg carton into a kitchen drawer organizer offers numerous benefits, making it a smart and eco-friendly choice for organizing your kitchen. Here are some of the benefits of upcycling and creative repurposing:
- Sustainable: By giving a new life to something that would otherwise be thrown away, you contribute to reducing waste and conserving resources.
- Cost-effective: Instead of buying expensive organizers, upcycling allows you to save money while still achieving an organized kitchen.
- Customizable: Upcycling gives you the freedom to create a drawer organizer that perfectly fits your needs and style, allowing you to personalize your kitchen organization.
With these benefits in mind, upcycling an egg carton into a kitchen drawer organizer not only helps you stay organized but also promotes sustainability and creativity. So why not give it a try and see the difference it makes in your kitchen?
Magnetic Strip Knife Holder
I highly recommend incorporating a magnetic strip knife holder into your DIY kitchen drawer organizers for efficient and accessible storage of your knives. This simple yet effective solution allows you to keep your knives within reach while freeing up valuable drawer space.
A magnetic strip knife holder is a versatile and practical addition to any kitchen. It securely holds your knives in place, preventing them from sliding around and potentially causing accidents. Additionally, it allows you to easily see and select the knife you need, saving you time and frustration.
To highlight the benefits of a magnetic strip knife holder, consider the following comparison:
| Traditional Knife Block | Drawer Organizer with Magnetic Strip | Magnetic Strip Knife Holder |
|---|---|---|
| Takes up counter space | Maximizes drawer space | Efficient use of kitchen space |
| Limited knife capacity | Accommodates multiple knives | Holds knives of various sizes |
| Conceals the knife blades | Displays knife blades | Easy identification of knives |
| Difficult to clean | Easy to clean and maintain | Hygienic and easy to sanitize |
As you can see, a magnetic strip knife holder offers several advantages over traditional knife storage methods. It is a cost-effective alternative to purchasing a new knife block and provides a sleek and modern look to your kitchen. By incorporating this organizer into your DIY kitchen drawer project, you can create a well-organized and efficient space for your knives.
Conclusion
In conclusion, these budget-friendly kitchen drawer organizers offer practical and creative solutions to keep your utensils and tools neatly organized. Whether you choose to make a DIY utensil tray divider, repurpose cardboard drawer inserts, customize wooden dividers, use mason jars, upcycle an egg carton, or opt for a magnetic strip knife holder, these options are easy to create and will help maximize space efficiency in your kitchen drawers. Say goodbye to clutter and hello to an organized and functional kitchen.


